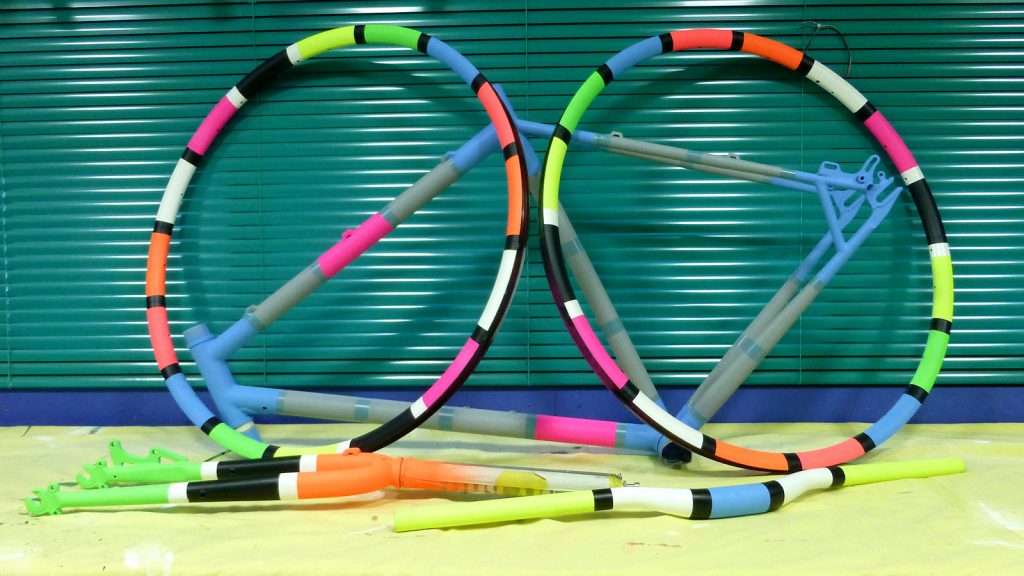
I’ve been busy these past few days in the shed, so time for an update in the custom single speed bicycle project. Well, colour painting is complete on both wheel rims, the front forks and the handlebars. And I must say they are all rather splendid, if I do say so myself. Actually, they are rather eye-catching to say the least and sunglasses are highly recommended. Not sure they glow in the dark but will find out soon enough. Still some finishing tasks to do on these components, namely a final wet and dry rub down with 1200 grit and two coats gloss top coat.
Work has started on the frame and perhaps the trickiest task was working out where to place the colour panels. The colour panels on the wheel rims are around 100 mm long with 20 mm black or white borders (the width of the masking tape). Took me about an hour to work this out. Lots of trial and error with a ruler and pencil before finally settling for something that would match the other items. Was also tricky trying to avoid placing borders where there is frame fitting such as cable mounts, bottle cage fittings and so on.
I’m following a different method this time with the frame and have started by masking all the locations where the black or white borders will be. Then I’ll start filling in the colour blocks and will leave the borders until the end. I hope this will result in fewer raised edges than before. As usual, always a steep learning curve. One issue with this style of painting is masking. Each time you want to spray you need to protect all the other parts of the frame and with a total of eight different colours being used, this is a nightmare.
I started using newspaper but that marks the paint, then I used cling film which is better but still fiddly to use. However, I had the thought to chop up the 300 mm wide roll into three 100mm long sections. Much easier to wrap around the tubular parts of the bike frame now, and also the wheel rims as well. To get a nice neat edge where different colours meet, I’m using automotive fine lining tape. It’s vinyl rather than paper and creates really sharp edges. Note that I decided on white borders where the panel is black. It would not work having a black border on black panel.
The only other component I may consider painting to match is the seat post, which is winging its way to me as I type. I had also thought about doing the mudguards – I have a set for this frame in the attic – but decided that might just be too much. All the other components will remain black and if they are not black, they soon will be. Oh, just noticed one error on my part and that was not centralising the valve stem hole within the colour panel. Not really that important but would have been better.
And by popular request a list of materials used.
- Spray.Bike 400ml fluro colours x6
- Spray.Bike 400ml solid colours x2
- Spray.Bike 400ml metal primer x2
- Spray.Bike 400ml satin/gloss transparent finish x2
- 160/600/1200 grade wet and dry paper
- AirGearPro M-500 Reusable Respirator Mask
- Assorted rags and dust sheets
- Cling film from Tesco, 75m roll
- Vinyl automotive fine lining tape
- Painters masking tape
- Disposable nitrile gloves
So far, I’ve only used one can of primer, which leaves one full can for another project and I suspect there may also be enough paint left in the cans, about 50% on average by weight, for another project. Perhaps not enough for another bicycle but possibly enough to do the Swifty Air kick scooter which does need some attention. We shall see. Back with more soon.
Copyright ©2023 Gary Buckham. All rights reserved.