
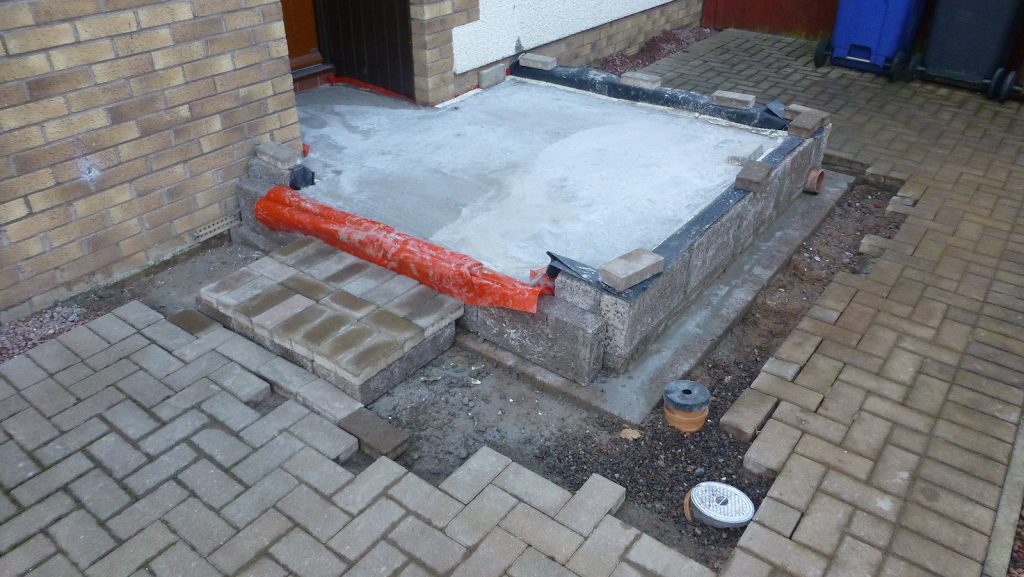
Wednesday 23rd saw the Return of the Builders and another stage in the epic saga of our ridiculously expensive nano-porch is completed. The floor slab. It was only this morning that I was able to uncover this masterpiece, it having been covered up the past few days until it hardened fully and could be walked on. I must say that I was most disappointed that the builders were going to leave the fresh concrete unprotected. I had to come up with something myself to stop people walking across it, namely in the way of a ladder and sheet of scrappy OSB (that’s Oriented Strand Board, if you want to know). I have no doubt if left uncovered there would be a trail of delivery driver boot marks, footprints from the postal delivery worker (cannot use the term postman or postwomen these days!) and paw prints from every cat and dog in the neighbourhood would make this a work of art.
So, what are the bits and bobs dotted about? Well, the black and orange plastic is DPM, damp-proof membranes, to stop ground water soaking up into the superstructure. The beige coloured pipe with the black blank end is where the rainwater downpipe will connect. The oval silvery thing is a rodding eye. This allows you to poke a stick down the underground surface water drains to clear blockages. The step is just temporary one I rigged up meantime. The beige pipe sticking out the side wall is where the existing substructure ventilator airbrick has been extended. There’s been one slight mishap, a brick has fallen onto the wet concrete and is now firmly embedded. But that isn’t really an issue as there will be a timber floor above. There was some strong wind the other night and I think the board shifted, dislodging the brick.
What next? Monday 28th should see the porch build really get going proper with the timber kit first to go up, probably followed by the roof. Not sure exactly when the door/screen and window will be installed and all the other trades for that matter. No matter, will be keeping an eye on them all and making sure they do things properly. Overall, I will admit they are not doing a bad job at all. Pretty good actually. Only issues we have had have been due to inclement weather.
Had a wee incident in the kitchen on Wednesday. Switched on the oven and was greeted with an almighty bang and flash, signalling the death of our IKEA built-in oven, off to the domestic appliance graveyard. My initial thought was the heating element had blown but testing with a multi-meter showed it still had continuity. Then I pulled the oven from the unit, a simple task with just four screws and a plug to remove, and tested the other elements, the light and the fan, but found nothing wrong. Also tested the fuse which was fine. So, it would appear that there’s a system fault somewhere beyond my ken. The only thing working is the electronic display and even that is only partially working. Next, we considered our options.
First, we thought about getting it repaired. However, with initial call out charges as high as £90 with any parts required on top of that, we decided, stuff that. With a new oven costing around £200 and ours over 10 years old, it did not make sense. Interestingly, to call someone out to install an oven, you are looking at around £100. Thankfully, it’s one of those DIY jobs that might look difficult at first glance but is really quite straight forward. I guess the tricky bit is making doubly sure that the new oven will fit the existing space. But as fitted ovens are generally designed to a standard size, that should not be an issue. Hopefully!
So, we ordered one online last night and it will be here (fingers crossed) today and I can get it installed. Pretty good going really. We’ve only been without an oven for one day and a special fish supper from Pia’s in Bonnyrigg soon sorted out dinner for that day.
“fast forward to 1845 hours”
It’s here. Our new oven has arrived. Right, lets see if it fits? Unpacking was easy enough but it’s a heavy beast to manage. However, to make things easier I removed the heavy glass door which must have reduced the weight my 25% or more. Just two little levers to flip and off she comes. Then the big moment. First the plug, easy enough. Remember to switch it on at the wall. Then Cathryn, aka ChoccyMuffin, and I manoeuvre the oven into position. Eureka! It fits perfectly. What a relief! Thought I might have to adjust the existing support rails. Job done. Now, how to get rid of the old oven. Oh, there’s a builder skip at the front door. Isn’t that ever so handy? Back soon.
Copyright ©2022 Gary Buckham. All rights reserved.